 Fridays with Vicky 124
Pinterest is all about sharing great images. Who thought that this could generate a massive amount of traffic to your site? Many bloggers rely on Pinterest traffic as one of their major traffic sources generating thousands of visitors each and every month. With 150+ million active monthly users, the potential to a lot of blog traffic is definitely there.
Some blogs and websites seem better suited than others for Pinterest. Niches like recipes, fashion, and crafts just to mention a few, tend to get traction and generate a lot of traffic from Pinterest. IF used correctly.
Those niches are not the only ones though generating massive amounts of traffic if you write about money, affiliate marketing or blogging, Pinterest can still be a great traffic source. But, I also see many saying that Pinterest is a total waste of time. The only really true way to see if Pinterest is for you or not is to try it out for yourself.
So that’s what I did.
I’ve had a Pinterest account for years, but like many, I pinned occasionally and wasn’t really engaging. Now, I’ve been using Pinterest actively for a couple of months and I’m starting to see how it can really benefit my site going forward.
Here are my…
9 Awesome Tips Getting Started with Pinterest
Let’s start with your blog, things you can do to make it easy, for yourself and others to pin your images. But first the formality 🙂 “This post may contain affiliate links, which means I may receive a small commission, at no cost to you, if you make a purchase through a link.”
1. Use Long Vertical Great Looking Images on Your Blog
When starting out blogging, I was using mostly horizontal images on my blog. Now I use both, yup I create one image for vertical use and one for horizontal use and I use them both in my post.
The long vertical images are great for Pinterest while the horizontal ones work great for Twitter.
So how do you create great looking images?
I like to keep things simple. I’m not a fan of spending time looking for free images on the internet. You never know if they are copyrighted either. The easiest and fastest way to get your images is to be a member of a site that offers unlimited downloads for a low monthly fee. I’ve tried out a few, right now I get my images at stockunlimited for a low monthly fee of $9. I like them because they offer unlimited downloads of good images.
Now when you have your image you want to make them look fabulous with a clear message. When these images are pinned you want people to see what the pin/post is about right away, that way you will attract the crowd that’s interested in the topic.
To edit the images, to add text, filters and more I use Canva. A great fabulous tool I use on a weekly basis.
Want to know more about image creating and clear messages?
Read – How to Create Great Looking Blog Post Images with a Clear Message
2. Use a “Pin It” Button
We want to make things as easy as possible for our readers to share our images on Pinterest.
I use Sumo for social media sharing but I also add a “Pin It” Button to my images. A “Pin It” button, just makes sharing your images on Pinterest easy. All they have to do is hover over the image, click the button and it will allow the reader to share the image and page with their followers.
You can simply download and activate the Pin It Pinterest Button, and you are good to go.
When we have things in order on our blog, it’s time to set up our Pinterest account and make sure it’s optimized.
3. Get a Pinterest Business vs Personal Account
There are two different kinds of Pinterest accounts available:
- Personal account
- Business account
There were 3 reasons why I decided to go with the business version
- Analytics, the business account allows you to see your stats while the personal account does not offer analytics. For me, this feature alone makes it worth setting up a business account. They are both free so no difference there.
- Rich Pins, this is pins with more “meat” on them. They are supposed to be more helpful for the user and deliver more information. Rich pins are similar to Twitter cards if you are familiar with them. There are 6 types of Rich pins are available, article, product, recipe, app, movie, and place.
- Promoted pins, these are pins that you would normally add but you can pay to have them promoted and get more visibility.
To set up a business account, log into Pinterest if you have an account already.
Go to your image in the upper right corner and click settings. From there you can change your account. Just follow the instructions.
4. Set Up Your Profile / Bio Make It Personal
Your profile is your first impression. Make it personal and fun, make it stick out a little.
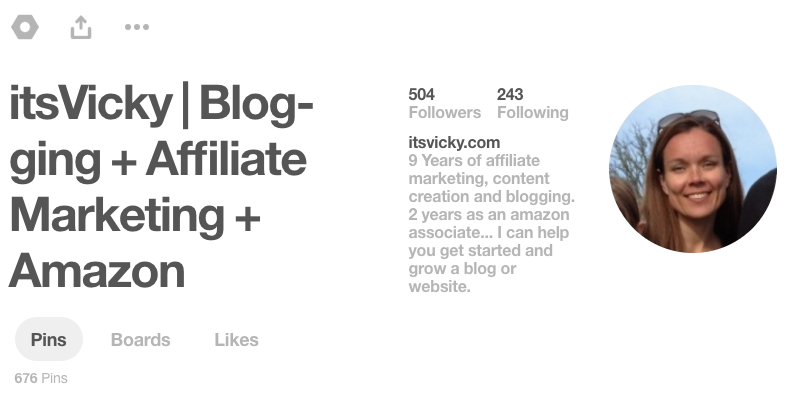
Add a title, as you can see my title is itsVicky.com but I also added a few keywords after so it’s easy to see what I pin about and what I can help with.
Add a description, the same thing with the description, I explain more about what I do and make sure I add in some good keywords.
Add an image, a personal image always connects better than just a random image of something totally unrelated.
5. Personalize Your Boards
Board covers – Should you use them? Some say yes some say they like the natural look of having different posts. I like covers because it gives your Boards the feeling that they belong together, they are a unity. Also, on the boards, you can clearly state what the board is about. I have boards called “best of itsVicky.com” “blogging for beginners” and so on. It gives a clear message of the board.

Board titles and descriptions – the board titles and descriptions should be informative but also add some keywords in a natural way.
You can also organize your boards and put them in the order you like. I put my most important boards highest up.
6. Pin on a Regular Basis
The more you pin the more exposure you’ll get. I’m not talking about spamming here but have a pinning schedule that gives you good exposure. I’ve worked myself up from pinning a few pins a day to now pinning around 18 – 20 times spread out through the day.
No, I don’t sit in front of the computer 24/7, although I do spend a lot of time on here. When things can be automated I like it. The tool I use to schedule my pins, that saves me a lot of time, is called Tailwind. Tailwind makes pin scheduling super easy and automated.
This little nifty scheduling tool has quickly become one of the “must have” in my toolbox. You can try Tailwind out for free to see if it is for you. 100 free scheduled pins after that you can choose to upgrade or not, it’s a very affordable time-saving tool so for me it was a definite go.
Another great feature Tailwind offers is that you can schedule your pins directly from a website (yours or anybody else). Click the tailwind logo after you install the app, and it will allow you to schedule the pin to multiple pages right there and then.
7. Keywords and Descriptions for your Pins
When you submit your pins, write keyword optimized pin descriptions, that are appealing. People will read them and make a decision to either go on to read more on your site or keep searching Pinterest.
You don’t want to keyword stuff your pins, but you want to make sure your pins can be found. That’s exactly what keywords can help with, get your pins found in the overwhelming amount of information that is offered. I use Jaaxy for my keyword research when writing blog posts. I use the same keywords for my pins as I do my posts.
8. Group Pins Can Put You Infront of a Big Crowd
I LOVE Pinterest Groups. These groups allow you to be part of a board where you and many others share pins. So instead of posting to your own board, you post to a board where others pin their content as well.
This can put you in front of a large crowd of pinners. Since using group boards I’ve seen the following:
- More followers
- More repins
- More engagement
You can find relevant groups at pingroupie.com. You might have to do some digging but the source can still be a great way to find relevant group boards.
When finding a group board you want to participate in, the board description will tell you if the group is open for new contributors and how to sign up to be one. It’s usually a pretty simple process. Most board creators want you to follow them and the board and then email them your Pinterest account and blog.

9. Engage, Pin and Interact with Other Pinterest Users
Just like any other social media platform, it’s all about engagement. Engage on Pinterest (although I must say they don’t really make this convenient to connect with others, I would like to see there PM feature improved). Pin and follow others and many will return the favor.
I would love to connect with you on Pinterest so feel free to contact me and send me a message and we can follow each other and help each other out.
Also when you engage with others in your niche, share your Pinterest profile and encourage them to share your content, in a nonintrusive way. It’s all about engagement and helping each other. If you approach social media with the attitude “how can I help” instead of “pin this for me” or “follow me” kind of attitude you will be much more successful.
What are your thoughts on Pinterest? Have you given it a serious try? Is it worth it for you or a waste of time?

Leave a Reply